ARP欺骗攻击识别与防御实战指南

妩媚怡口莲
1. ARP欺骗攻击现象识别
当网络遭遇ARP欺骗攻击时,通常会出现以下三种典型症状。作为网络管理员,我经常通过这些特征快速判断攻击情况:
1.1 网络连接异常现象
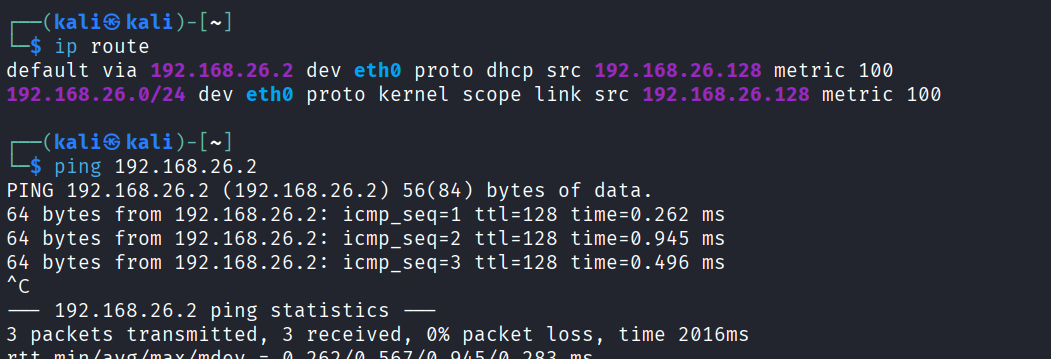
最直观的表现就是设备能够连接局域网但无法访问外网。具体表现为:
- WiFi显示已连接状态
- ipconfig命令显示IP地址配置正常
- 能够ping通网关IP地址
- 但所有外网服务(网页、QQ、微信等)均无法使用
这种情况特别具有迷惑性,因为很多用户会误以为是外网故障。实际上,这是由于攻击者伪造了网关ARP响应,导致你的数据包被发送到了错误的MAC地址。
实战经验:遇到这种情况时,我会先用tracert命令测试路由路径。如果数据包在网关处就断了,极可能是ARP欺骗。
1.2 网关MAC地址异常变化
通过arp -a命令可以观察到:
- 当前显示的网关MAC地址与网络正常时记录的合法网关MAC不一致
- 连续执行arp -a命令时,网关MAC地址在不同值之间跳变
- 有时会显示多个IP对应同一个MAC地址(通常是攻击者的MAC)
我在实际排查中会建立一个基准数据库,记录所有关键网络设备的合法MAC地址。这样在排查时就能快速比对异常。
1.3 网络抓包分析
使用Wireshark等工具抓包时,会观察到:
- 大量"免费ARP"报文(Gratuitous ARP)
- 这些报文声称"我是网关,我的MAC是XX:XX:XX..."
- 报文源MAC地址与合法网关不一致
- ARP响应频率异常高(正常网络不会频繁更新ARP缓存)
下图是我在一次实际攻击排查中的抓包截图,可以看到攻击者(00:0c:29...)在持续发送伪造的ARP响应:
2. 基础防御措施实施
2.1 手动静态绑定网关
这是最直接有效的防御方法,我推荐所有重要主机都进行配置。具体步骤:
- 确定合法网关信息
bash复制# Linux/macOS
ip route show | grep default
# Windows
route print
- 清空现有ARP缓存
bash复制# Windows
arp -d *
# Linux
ip neigh flush all
- 查看正确网关MAC
在清空缓存后的短时间内快速执行:
bash复制# Windows
arp -a
# Linux
arp -n 或 ip neigh
- 永久静态绑定
bash复制# Windows
arp -s 网关IP 网关MAC
# Linux
arp -i eth0 -s 网关IP 网关MAC
重要提示:静态绑定在系统重启后会失效。要使绑定永久生效:
- Windows:创建开机脚本
- Linux:写入/etc/ethers文件并启用arpd服务
2.2 使用ARP防护工具
我推荐使用专业的ARP防护工具如ArpON。以下是详细安装配置指南:
- 安装ArpON
bash复制sudo apt update
sudo apt install arpon -y
- 验证安装
bash复制arpon --version
- 基本启动
bash复制sudo arpon -d -i eth0 -s
参数说明:
- -d:守护进程模式
- -i:指定监控网卡
- -s:静态防护模式
- 高级配置
创建配置文件/etc/arpon.conf:
ini复制# 监控网卡
interface = eth0
# 防护模式
mode = hybrid
# 日志记录
logfile = /var/log/arpon.log
- 设为系统服务
bash复制sudo systemctl enable arpon
sudo systemctl start arpon
3. 企业级防御方案
3.1 交换机端口安全
在企业网络中,我通常会配置交换机的端口安全功能:
- MAC地址绑定
cisco复制interface GigabitEthernet0/1
 switchport port-security
 switchport port-security maximum 2
 switchport port-security mac-address xxxx.xxxx.xxxx
 switchport port-security violation restrict
- DAI(动态ARP检测)
cisco复制ip arp inspection vlan 10
ip arp inspection validate src-mac dst-mac ip
- DHCP Snooping
cisco复制ip dhcp snooping vlan 10
ip dhcp snooping trust
3.2 网络分段与隔离
- VLAN划分
- 按部门划分VLAN
- 关键服务器单独VLAN
- 使用私有VLAN进一步隔离
- ACL策略
cisco复制access-list 110 deny arp any any
access-list 110 permit arp host 合法网关 any
access-list 110 permit arp any host 合法网关
4. 监测与响应
4.1 实时监测方案
- ARPWatch
bash复制sudo apt install arpwatch
sudo systemctl start arpwatch
- 自定义监控脚本
python复制#!/usr/bin/env python3
import os
import time

LEGAL_GATEWAY = "00:11:22:33:44:55"

def check_arp():
    result = os.popen("arp -a").read()
    if LEGAL_GATEWAY not in result:
        alert_admin()

while True:
    check_arp()
    time.sleep(60)
4.2 应急响应流程
当检测到ARP欺骗攻击时,我的标准响应流程:
- 立即隔离
- 断开可疑端口
- 封锁攻击源MAC
- 取证分析
- 保存ARP缓存
- 保存交换机日志
- 抓包取证
- 恢复措施
- 重置受影响主机ARP缓存
- 验证网关绑定
- 监控网络流量
5. 防御效果验证
5.1 测试方法
- 使用arpspoof测试
bash复制arpspoof -i eth0 -t 目标IP 网关IP
- 观察防御效果
- 网络应保持通畅
- arp -a显示正确的网关MAC
- 防火墙日志记录攻击尝试
5.2 长期维护建议
- 定期审计
- 每月检查ARP绑定
- 审核交换机配置
- 更新MAC地址数据库
- 员工培训
- 识别网络异常症状
- 基本故障排除流程
- 安全事件报告机制
在实际网络管理中,ARP欺骗防御需要结合技术手段和管理制度。我建议至少部署三层防御:终端静态绑定、网络设备防护和实时监控告警。对于特别重要的网络环境,还可以考虑部署专业的网络安全防护系统。
内容推荐
基于STM32的老年人健康监护物联网系统设计与实现
物联网技术在健康监护领域的应用正变得越来越广泛,特别是在老年人健康监测方面。通过嵌入式系统与传感器网络的结合,可以实现对心率、体温等生理参数的实时监测。STM32系列微控制器凭借其高性能和低功耗特性,成为此类应用的理想选择。系统采用PulseSensor光电式心率传感器和DS18B20温度传感器采集数据,通过SIM800C模块实现GPRS通信,并基于MQTT协议将数据上传至云平台。在工程实践中,低功耗设计和通信可靠性是关键挑战,需要合理运用电源管理策略和信号处理算法。这种技术方案不仅适用于老年人监护,也可扩展至运动员训练监测、慢性病管理等场景,具有广阔的应用前景。
Gin框架中间件原理与实战指南
中间件是Web开发中的核心概念,本质上是HTTP请求处理管道中的过滤器组件。其工作原理基于洋葱模型,请求会依次通过各层中间件处理,每个中间件都能对请求进行拦截、修改或增强。在Golang生态中,Gin框架通过简洁的HandlerFunc接口实现了高效的中间件机制,支持认证、日志、限流等常见功能。从技术价值看,中间件实现了横切关注点的模块化,大幅提升代码复用率。典型应用场景包括API网关、微服务架构等,其中JWT认证和Prometheus监控是当前的热门实践。本文以Gin框架为例,深入解析中间件设计模式与性能优化技巧。
MATLAB圆锥滚子轴承故障仿真系统开发与应用
轴承故障仿真是旋转机械状态监测的核心技术,基于Hertz接触理论和Runge-Kutta数值积分方法,可高效模拟轴承动态响应。通过参数化建模,系统能精确复现外圈故障(BPFO)和内圈故障(BPFI)特征频率,误差控制在5%以内。该技术在风电齿轮箱等工业场景中,为故障诊断算法验证提供了高保真数据源,相比实验方法可缩短60%开发周期。系统采用模块化设计,支持并行计算优化,在普通工作站上3秒即可完成1秒工况仿真。
Elastic AutoOps:免费自动化运维平台的核心功能与应用
自动化运维是现代DevOps实践中的关键技术,通过将服务器监控、日志分析和异常处理等操作自动化,显著提升系统稳定性和运维效率。其核心原理是基于智能算法建立系统行为基线,实现异常检测与预测。Elastic AutoOps作为一款新开放的免费运维平台,集成了智能监控和自动化修复引擎,支持Node.js等50+技术栈的深度监控,采用分布式数据采集和实时分析架构,能在500毫秒内完成异常检测。该工具特别适用于Web应用和微服务架构,通过自动预警内存泄漏等问题,帮助团队降低MTTR(平均修复时间)。对于中小团队而言,这种专业级工具的免费开放大幅降低了运维自动化的技术门槛。
机器人租赁现场确认痛点与解决方案
在智能设备租赁场景中,状态确认是保障活动顺利执行的关键环节。从技术实现角度看,这涉及到物联网状态监控、实时数据传输等基础技术原理。通过设备状态可视化、自动化播报等技术手段,能够有效降低人工确认需求,提升活动执行效率。特别是在商场巡游、展会表演等应用场景中,实时的电量监控、网络状态检测和位置追踪等技术方案,解决了活动组织者最关心的设备就绪、互动触发和时间同步三大核心问题。本文结合机器人租赁实践案例,详细解析了如何通过专人对接机制、状态可视化方案和标准化流程设计,将技术监控数据转化为客户可理解的确定性信息,最终实现活动执行效率提升40%以上的实践成果。
深入解析Go语言RWMutex读写锁原理与实战
读写锁(RWMutex)是并发编程中的核心同步原语,通过区分读写操作显著提升系统性能。其核心原理基于写互斥、读共享的锁机制,特别适合读多写少的场景如缓存系统、配置管理等。技术实现上通过原子计数器管理读者数量,结合信号量实现高效调度。相比普通互斥锁,RWMutex在纯读场景吞吐量可提升N倍(读者并发数),在读写比超过10:1时优势明显。典型应用包括数据库连接池、热更新配置系统等高并发场景,配合Go语言的atomic包和runtime调度器实现高性能并发控制。
DRAM动态随机存取存储器原理与工程实践
动态随机存取存储器(DRAM)是现代计算机系统的核心记忆体,采用1T1C(单晶体管单电容)结构实现数据存储。其工作原理基于电容电荷状态表示二进制数据,具有纳秒级高速存取特性,但需要持续刷新维持数据。在工程实现上,地址复用技术显著减少引脚数量,而灵敏放大器设计需要检测微小的电荷变化。DRAM广泛应用于服务器、移动设备和图形处理等领域,其3D堆叠技术持续推动存储密度提升。通过优化刷新算法和PCB设计,可以有效提升系统性能,例如采用异步刷新策略可将性能损失控制在5%以内。
以太坊账户模型详解:EOA与合约账户的核心机制
区块链账户系统是数字资产管理的核心基础设施,其通过非对称加密技术实现所有权验证。以太坊创新性地采用混合账户模型,包含外部拥有账户(EOA)和合约账户两种类型。EOA由私钥控制,遵循Keccak-256哈希算法生成地址,支持交易发起;合约账户则由代码逻辑驱动,通过CREATE操作部署。这种设计既保障用户资产自主权,又为智能合约提供执行环境,支撑DeFi、NFT等复杂应用场景。账户安全涉及nonce防重放、gas费用计算等关键机制,开发者需掌握BIP-39助记词和多重签名等安全方案。随着EIP-4337账户抽象的推进,以太坊账户体系正向着更灵活的方向演进。
莱丹WELDY热风枪:工业级精密焊接与维修利器
热风枪作为电子维修和工业制造领域的关键工具,其温度控制精度和风量调节能力直接影响焊接质量。PID闭环控制系统能实现±3℃的温控精度,配合20-800L/min的无级风量调节,使设备可精准应对从SMD元件拆焊到塑料焊接等复杂场景。工业级热风枪采用直接集成在风嘴的温度传感器和双风扇设计,解决了传统工具温度漂移和风量不均的痛点。以莱丹WELDY系列为例,其人体工学设计和2000小时使用寿命,使其成为手机维修、汽车制造等领域的首选工具,特别在BGA芯片处理和聚碳酸酯焊接等精密作业中展现出色性能。
本科生论文AI降重工具评测与使用指南
在学术写作中,论文查重是确保学术诚信的重要环节。随着AI写作工具的普及,如何有效降低AI生成内容的查重率成为学生面临的新挑战。从技术原理来看,查重系统通过文本特征分析和语义比对识别AI内容,而专业的降重工具则运用自然语言处理技术进行语义保持的改写。这类工具在学术写作辅助领域具有重要价值,能帮助学生通过同义词替换、句式重构等方式优化论文。本文基于实际测试数据,对比分析了千笔AI、云笔AI等9款主流工具的改写质量、查重适配性和操作便捷性,并提供了分阶段降重策略和具体操作技巧,为面临查重困境的学生提供实用解决方案。
VS Code自动保存功能配置与优化指南
代码自动保存是现代IDE的核心功能之一,通过文件监听和防抖技术实现智能保存。这项技术解决了开发者频繁手动保存的痛点,在断电保护、团队协作等场景中尤为重要。VS Code提供了afterDelay、onFocusChange等多种自动保存模式,支持毫秒级延迟配置。合理设置自动保存参数不仅能提升开发效率,还能与Git版本控制、代码格式化等功能形成工作流闭环。针对前端热更新、大型项目等不同场景,本文提供了详细的配置建议和性能优化技巧,帮助开发者构建更稳定的编码环境。
链表设计与虚拟头节点技巧详解
链表是数据结构中的基础类型,通过节点间的指针链接实现动态存储。其核心原理在于指针操作,包括节点的插入、删除和遍历。虚拟头节点(dummy node)技术能显著简化链表操作,统一处理逻辑,避免头节点特殊情况。在工程实践中,链表广泛应用于内存管理、文件系统和数据库索引等场景。LeetCode 707题要求实现完整的链表类,涉及get、addAtHead、addAtTail等基本操作,是掌握链表指针操作和边界处理的经典案例。通过虚拟头节点和双向链表优化,可以提升操作效率,减少代码复杂度。
光计算芯片云端协同设计:Lightmate解决方案解析
光计算芯片作为突破传统电子芯片性能瓶颈的新兴技术,通过光子代替电子进行信息处理,在人工智能、高性能计算等领域展现出巨大潜力。其核心技术在于光子器件的精确设计与多物理场耦合仿真,但传统研发模式面临周期长、协同难等挑战。百度智能云与光本位科技联合推出的Lightmate解决方案,采用云端分布式仿真和光-电-热联合优化技术,将典型设计周期从6-12个月缩短至2-4周。该平台集成神经网络架构搜索与光子器件特性匹配算法,显著提升芯片性能和良率,为光计算芯片的产业化提供了关键技术支持。
量子计算在药物分子模拟中的革命性应用
量子计算作为新一代计算范式,通过量子叠加和纠缠等特性,在分子模拟领域展现出革命性优势。其核心原理是利用量子比特的并行计算能力,将传统计算机难以处理的指数级复杂问题转化为可求解形式。在药物研发领域,量子计算特别适用于解决电子相关性问题和分子构象搜索等关键挑战。通过VQE等量子-经典混合算法,研究人员可以在现有NISQ设备上实现精确的分子能量计算。DREAMVFIA等开源框架的推出,进一步降低了量子药物模拟的技术门槛。这些技术进步正在推动从蛋白质-配体相互作用研究到新型药物分子设计的全流程创新,为缩短药物研发周期、降低研发成本提供了全新可能。
家庭IP代理技术解析与应用实践指南
IP代理作为网络隐私保护与数据采集的关键技术,其核心原理是通过中间服务器转发请求实现身份隐匿。家庭IP代理相比传统数据中心代理具有更高的真实性与隐蔽性,这源于其动态分配的家庭宽带IP特性与NAT地址转换技术。在工程实践中,动态DNS解析与NAT穿透技术保障了服务的稳定性,使其广泛应用于市场调研、本地化测试等需要模拟真实用户行为的场景。特别是在电商数据采集与流媒体区域测试中,家庭IP代理能有效规避反爬机制,同时满足合规性要求。通过合理配置路由器端口转发与安全策略,可以构建高性能的代理服务网络。
双功能PEG交联剂SPA-PEG-SPA的合成与应用
在生物偶联化学中,交联剂是实现分子精准连接的关键工具。双功能PEG交联剂SPA-PEG-SPA通过两端的NHS活性基团与氨基高效反应,中间的PEG链提供水溶性和生物相容性,形成稳定的酰胺键连接。这种设计使其在抗体-药物偶联物(ADC)开发、蛋白质修饰和纳米颗粒功能化等生物医药领域具有重要价值。其核心优势在于可调节的PEG链长能平衡空间位阻与分子柔性,3400 Da的PEG链特别适合大分子偶联。通过优化pH值、溶剂体系和反应温度等参数,可显著提升偶联效率。在ADC制备中,该交联剂能实现3-4的药物抗体比(DAR),同时降低免疫原性。
CentOS/RHEL系统RPM数据库损坏修复指南
RPM(Red Hat Package Manager)是Linux系统中广泛使用的软件包管理工具,其底层依赖Berkeley DB(BDB)数据库存储软件包元数据。当系统异常断电或进程强制终止时,BDB数据库可能发生损坏,导致出现'BDB0113'等错误代码,影响yum/dnf等包管理操作。数据库事务机制要求严格的完整性校验,运维中常见的修复手段包括重建数据库文件(rpm --rebuilddb)或使用db_recover工具深度修复。在云计算和自动化运维场景下,建议结合Zabbix监控和定期验证任务(rpm --verifydb)进行预防性维护。对于高可用性要求的环境,可考虑迁移至SQLite等更稳定的数据库后端。
STM32智能存取柜系统设计与实现全解析
嵌入式系统开发中,STM32系列单片机因其高性能和丰富外设被广泛应用于物联网设备。通过硬件抽象层(HAL)和实时操作系统(RTOS)的结合,开发者可以高效实现多任务管理。在智能存取柜这类物联网终端设备中,关键技术点包括低功耗设计、无线通信稳定性以及机电控制可靠性。以Wi-Fi+蓝牙双模通信为例,既保证了远程管理能力,又优化了近场交互体验。电磁锁驱动等关键外设的电路设计直接影响系统稳定性,采用MOSFET器件和看门狗机制是工程实践中的有效方案。这些技术在快递柜、智能仓储等场景具有重要应用价值,本文详细剖析了基于STM32F407的完整实现方案。
Anaconda环境配置与Python数据科学开发实战指南
Python虚拟环境是数据科学开发的基础设施,通过环境隔离可以解决不同项目间的依赖冲突问题。Anaconda作为最流行的Python发行版,集成了Conda包管理器和Jupyter等科学计算工具链。其核心技术价值在于创建可复现的开发环境,通过版本锁定和依赖解析保证项目稳定性。在机器学习、数据分析等应用场景中,合理的环境配置能提升开发效率并降低协作成本。本文以Anaconda为核心,详解环境创建、Jupyter配置、包管理加速等实战技巧,特别包含Matplotlib中文显示优化和Pandas性能调优等高频需求解决方案,并分享VS Code集成与环境监控等生产力提升方法。
LabVIEW与VisionPro集成实现高效工业视觉检测
工业视觉检测是现代智能制造的核心技术之一,通过图像处理算法实现产品质量的自动化检测。LabVIEW作为图形化编程平台,与VisionPro强大的视觉算法库结合,可以显著提升检测系统的开发效率和运行性能。在半导体封装、PCB检测等场景中,这种集成方案能够实现亚像素级定位精度和99%以上的缺陷检出率。关键技术包括.NET Assembly调用、图像数据格式转换以及多线程优化,其中VisionPro的PMAlign工具和CogCaliperTool等算法组件在工业实践中表现尤为突出。通过合理的架构设计,这种方案可使视觉系统处理速度提升3倍以上,同时保持LabVIEW快速原型开发的优势。
已经到底了哦
精选内容
1 Spring Boot端口占用排查与解决方案全指南2 SSM+Vue课程管理系统开发与论文写作指南3 Unity游戏开发中的A*寻路算法实现与优化4 MapReduce核心原理与大数据处理实践5 国产PLM系统崛起:从本土化优势到技术创新6 Python函数优化:从基础实现到极致性能7 蓝牙协议仿真全流程解析与优化实践8 Windows桌面操作技巧与高效使用指南9 Abaqus复合材料多尺度仿真技术与应用10 Arch Linux屏幕亮度调节失效的排查与解决方案
热门内容
1 Python数据库开发:SQLAlchemy ORM核心指南2 智能农业灌溉系统核心技术解析与商业价值3 Premiere Pro多语言字幕样式同步高效技巧4 浏览器Notification API:跨应用通知的实现与优化5 微信小程序报修系统开发实践与优化6 Odoo 19销售订单自动生成发票配置指南7 Vue3组件开发与Composition API实战指南8 Nginx跨域配置全解析与实战指南9 医药行业EDI对接实战:从采购到发票的全流程自动化10 iSCSI技术详解:从原理到企业级部署实践
最新内容
FrankenPHP:PHP线程化运行时与性能优化实践
PHP作为动态脚本语言的传统执行模式面临性能瓶颈,现代解决方案通过线程化改造实现质的飞跃。线程安全(ZTS)模式允许PHP解释器在多个线程间共享状态,配合定制化的Zend内存管理器,可构建高效的内存隔离机制。这种技术显著提升了并发处理能力,特别适合报表生成、实时数据处理等高吞吐场景。以FrankenPHP为例,其创新的1:1线程模型将请求处理内存占用降低60%,在电商促销等压力测试中实现12K QPS。开发时需注意全局变量需用TSRM宏保护,扩展需重新编译为ZTS版本。通过Kubernetes部署方案可进一步节省70%的Pod资源,但需合理设置HPA阈值控制故障域。
企业级AI视频平台架构设计与容器化部署实践
视频分析平台作为AI落地的关键技术,通过硬件抽象层和微服务架构实现异构计算资源的统一管理。其核心原理是利用容器化技术封装不同硬件驱动,通过标准接口向上层提供统一服务。这种架构显著提升了开发效率,解决了安防行业面临的设备协议碎片化、算力异构等痛点。典型应用场景包括智慧园区管理、零售客流分析和工业安全生产监测。其中,基于Docker的容器化部署和Kubernetes集群管理方案,实现了算法模型的热加载与跨平台迁移,配合ONNX格式的模型转换工具链,使系统在NVIDIA GPU、华为昇腾NPU等不同硬件间获得最佳兼容性。
多邻国英语测试(DET)备考全攻略:162小时科学计划与提分技巧
英语能力测试作为评估非母语者语言水平的重要工具,其自适应算法通过动态调整题目难度精准测量考生能力边界。多邻国英语测试(DET)凭借其便捷的在线考试形式,已成为留学申请中广泛认可的语言证明。考试包含听力、口语、阅读、写作四个核心模块,采用10-160分评分制,其中学术高频词汇和语法准确性是影响成绩的关键因素。备考过程中,精听训练法能有效提升听力辨音能力,而结构化表达模板则确保口语和写作的得分稳定性。通过162小时的阶段式训练,结合每日模考数据分析,考生可以系统性地突破分数瓶颈,最终达到120分以上的院校录取要求。
物联网通信协议对比:MQTT与Zenoh的架构与性能分析
物联网通信协议是连接智能设备的核心技术,其设计直接影响系统性能和扩展性。MQTT作为传统发布/订阅协议的代表,采用中心化Broker架构,适合设备监测等基础场景。而新兴的Zenoh协议创新性地采用混合架构,支持P2P直连和智能路由,在边缘计算和实时控制场景中展现出显著优势。两种协议在延迟性能、吞吐量和功能丰富度上存在明显差异,其中Zenoh的局域网P2P模式可实现0.1-0.5ms超低延迟,并原生支持请求/响应等多种通信范式。对于工业机器人、智能电网等对实时性要求高的物联网应用,协议选型需要综合考虑网络环境、性能需求和技术生态等因素。
低代码开发:范式争议、核心价值与工程实践
低代码开发(Low Code)作为软件开发领域的新范式,正在引发关于其本质与价值的深度讨论。从技术原理看,它通过可视化编程和声明式语法,将传统手写代码(Pro Code)转化为可配置的组件化开发,显著提升了CRUD类应用的构建效率。在工程实践中,低代码平台通过内置最佳实践、自动化测试和标准化组件,解决了传统开发中技术债务累积、全链路能力要求高等痛点。其核心价值体现在组织赋能层面,使业务人员能直接参与应用构建,缩短了从需求到产品的路径。典型应用场景包括内部工具、标准化流程和快速原型开发,但在复杂算法、高性能计算等场景仍存在表达局限。随着AI增强和垂直领域深化,低代码正与Pro Code形成互补共生的技术生态。
ECharts饼图最小角度(minAngle)配置指南
数据可视化中,饼图是展示比例关系的经典图表类型,其核心原理是将数据值映射为360度圆环的扇形角度。当数据分布极不均匀时,传统饼图会出现小数据项难以辨识的问题,这直接影响数据可读性和决策效率。ECharts库通过minAngle参数实现视觉权重优化,该参数强制为每个扇形分配最小角度,既保留主要数据比例关系,又确保长尾数据可见性。在电商销售分析、用户满意度调查等典型场景中,合理设置5-10度的minAngle能显著提升图表表现力。配合avoidLabelOverlap等参数使用,可构建兼顾准确性与美观度的可视化方案。
全栈商业顾问:跨界整合与实战能力解析
在数字化转型浪潮中,商业顾问的角色正经历深刻变革。全栈商业顾问(Full-stack Business Consultant)作为新兴职业形态,融合了战略咨询与技术落地的双重能力,其核心在于T型能力结构的构建——纵向深耕行业细节,横向整合跨领域资源。从技术理解与转化能力到资源拼图能力,全栈顾问需要精准评估技术实现成本(如规则引擎与机器学习方案的性价比对比),并建立丰富的解决方案资源池(如包含237个验证服务商的资源网络)。这种能力模型特别适用于新零售、智能制造等需要跨界整合的场景,通过乐高积木式的模块化方案设计,实现快速响应客户需求与成本控制的最佳平衡。
构建实时AI知识更新系统的关键技术解析
在动态信息处理领域,实时知识更新是提升AI模型实用性的核心技术。传统基于静态数据训练的模型面临严重时效性问题,而通过智能爬虫与搜索引擎优化技术结合,可构建持续进化的知识获取管道。关键技术涉及多源异构数据处理、动态渲染对抗策略以及时效性知识注入机制,其中Google CSE API与Playwright等工具能有效解决反爬与动态内容获取难题。这类系统在金融舆情监测、公共卫生预警等场景展现巨大价值,实测能将信息时效性从182天提升至3.2天。通过语义过滤算法和时效性衰减函数的设计,实现了对政策法规、科技动态等时效敏感内容的精准捕捉,为决策支持系统提供实时数据支撑。
低延时直播技术:DVB-DASH与DASH IF方案对比与实践
低延时直播技术是流媒体领域的重要发展方向,尤其在体育赛事、在线教育等实时交互场景中具有关键作用。其核心技术原理包括分片压缩、预加载提示和时钟同步等机制,通过优化传输协议和编码参数实现端到端延迟的大幅降低。DVB-DASH和DASH IF是当前主流的两种技术方案,前者借鉴广播电视传输特性,后者更侧重互联网环境适应性。在实际应用中,需要根据网络条件和业务需求选择合适的方案,并结合编码器参数优化、客户端缓冲策略等工程实践手段。通过卡塔尔世界杯等大型赛事的实测数据表明,合理配置的低延时直播系统可以将延迟控制在3秒以内,显著提升用户体验和商业价值。
ConPTY故障修复与英语技术文档语法解析
在Windows系统开发中,ConPTY(控制台伪终端)是实现终端模拟的核心技术组件。当ConPTY出现故障时,系统通常会建议禁用该功能以恢复终端运行,这涉及到操作系统层面的进程通信机制。技术文档中的英语语法结构,特别是介词短语作状语的用法,直接影响着错误信息的准确传达。通过分析'if ConPTY is broken on this machine'这样的典型技术语句,可以掌握如何精确描述软件故障范围和环境依赖。这种语法规范在API文档编写、错误信息设计等工程实践中尤为重要,能有效提升开发者在Windows平台、Linux子系统等跨环境开发时的排错效率。